Developer Guide
Table of Contents
- Acknowledgements
- Setting up, getting started
- Design
- Implementation Highlights
- Documentation, logging, testing, configuration, dev-ops
- Appendix A: Requirements
- Appendix B: Instructions for Manual Testing
1. Acknowledgements
- Code base: addressbook-level3
2. Setting up, getting started
Refer to the guide Setting up and getting started.
3. Design
.puml files used to create diagrams in this document can be found in the diagrams folder. Refer to the PlantUML Tutorial at se-edu/guides to learn how to create and edit diagrams.
3.1 Architecture

The Architecture Diagram given above explains the high-level design of the App.
Given below is a quick overview of main components and how they interact with each other.
Main components of the architecture
Main has two classes called Main and
MainApp. It is responsible for,
- At app launch: Initializes the components in the correct sequence, and connects them up with each other.
- At shut down: Shuts down the components and invokes cleanup methods where necessary.
Commons represents a collection of classes used by multiple other components.
The rest of the App consists of four components.
-
UI: The UI of the App. -
Logic: The command executor. -
Model: Holds the data of the App in memory. -
Storage: Reads data from, and writes data to, the hard disk.
How the architecture components interact with each other
The Sequence Diagram below shows how the components interact with each other for the scenario where the user issues the command delete 1.

Each of the four main components (also shown in the diagram above),
- defines its API in an
interfacewith the same name as the Component. - implements its functionality using a concrete
{Component Name}Managerclass (which follows the corresponding APIinterfacementioned in the previous point.)
For example, the Logic component defines its API in the Logic.java interface and implements its functionality using the LogicManager.java class which follows the Logic interface. Other components interact with a given component through its interface rather than the concrete class (reason: to prevent outside component’s being coupled to the implementation of a component), as illustrated in the (partial) class diagram below.

The sections below give more details of each component.
3.2 UI component
API : Ui.java

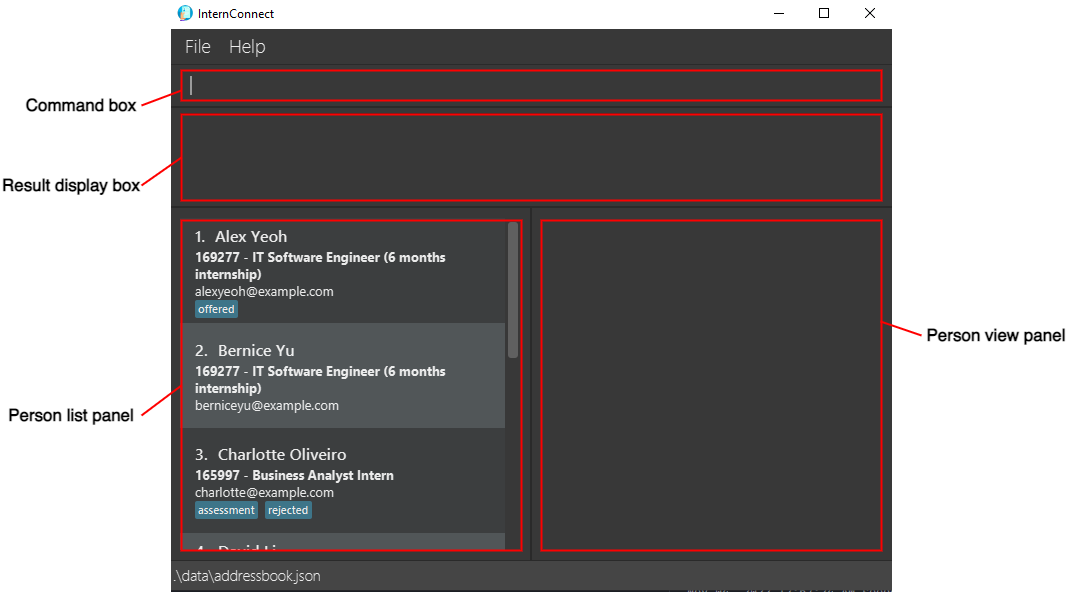
The UI consists of a MainWindow that is made up of parts e.g.CommandBox, ResultDisplay, PersonListPanel, PersonViewPanel, StatusBarFooter etc. All these, including the MainWindow, inherit from the abstract UiPart class which captures the commonalities between classes that represent parts of the visible GUI.
The UI component uses the JavaFx UI framework. The layout of these UI parts are defined in matching .fxml files that are in the src/main/resources/view folder.
For example, the layout of the MainWindow
is specified in MainWindow.fxml
The UI component,
- executes user commands using the
Logiccomponent. - listens for changes to
Modeldata so that the UI can be updated with the modified data. - keeps a reference to the
Logiccomponent, because theUIrelies on theLogicto execute commands. - depends on some classes in the
Modelcomponent, as it displaysPersonobject residing in theModel.
The Graphical UI that will be displayed to user upon launching InternConnect is depicted below.
3.3 Logic component
API : Logic.java
Here’s a (partial) class diagram of the Logic component:

How the Logic component works:
- When
Logicis called upon to execute a command, it uses theAddressBookParserclass to parse the user command. - This results in a
Commandobject (more precisely, an object of one of its subclasses e.g.,AddCommand) which is executed by theLogicManager. - The command can communicate with the
Modelwhen it is executed (e.g. to add an applicant). - The result of the command execution is encapsulated as a
CommandResultobject which is returned fromLogic.
The Sequence Diagram below illustrates the interactions within the Logic component for the execute("delete 1") API call.

DeleteCommandParser
should end at the destroy marker (X) but due to a limitation of PlantUML, the lifeline reaches the end of diagram.
Here are the other classes in Logic (omitted from the class diagram above) that are used for parsing a user command:

How the parsing works:
- When called upon to parse a user command, the
AddressBookParserclass creates anXYZCommandParser(XYZis a placeholder for the specific command name e.g.,AddCommandParser) which uses the other classes shown above to parse the user command and create aXYZCommandobject (e.g.,AddCommand) which theAddressBookParserreturns back as aCommandobject. - All
XYZCommandParserclasses (e.g.,AddCommandParser,DeleteCommandParser, …) inherit from theParserinterface so that they can be treated similarly where possible e.g, during testing.
3.4 Model component
API : Model.java

The Model component,
- stores the address book data i.e., all
Personobjects (which are contained in aUniquePersonListobject). - stores the currently ‘selected’
Personobjects (e.g., results of a search query) as a separate filtered list which is exposed to outsiders as an unmodifiableObservableList<Person>that can be ‘observed’ e.g. the UI can be bound to this list so that the UI automatically updates when the data in the list change. - stores a
UserPrefobject that represents the user’s preferences. This is exposed to the outside as aReadOnlyUserPrefobjects. - does not depend on any of the other three components (as the
Modelrepresents data entities of the domain, they should make sense on their own without depending on other components)
Tag list in the AddressBook, which Person references. This allows AddressBook to only require one Tag object per unique tag, instead of each Person needing their own Tag objects.
3.5 Storage component
API : Storage.java

The Storage component,
- can save both address book data and user preference data in json format, and read them back into corresponding objects.
- inherits from both
AddressBookStorageandUserPrefStorage, which means it can be treated as either one (if only the functionality of only one is needed). - depends on some classes in the
Modelcomponent (because theStoragecomponent’s job is to save/retrieve objects that belong to theModel)
3.6 Common classes
Classes used by multiple components are in the seedu.addressbook.commons package.
4. Implementation Highlights
This section describes some noteworthy details on how certain features are implemented.
4.1 Checkout Feature
Implementation
The checkout mechanism is facilitated by CheckoutCommand that extends Command. It is supported by CheckoutCommandParser and AddressBookFile.
It implements the following operations:
-
CheckoutCommand#execute()— Executes the command to switch to a particular list stored in thedatafolder parsed from theuserInputusingCheckoutCommandParser#parse(). -
CheckoutCommand#equals()— Checks whether an instance of aCheckoutCommandis equal to another, by checking:- Whether they are the same instance
- Whether the specified list is the same in two different instances
Given below is an example usage scenario and how the checkout mechanism behaves at each step.
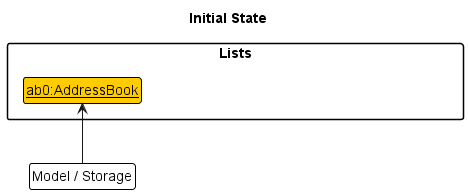
Step 1. The user launches the application for the first time. The Model and Storage will be initialized with the
default list.
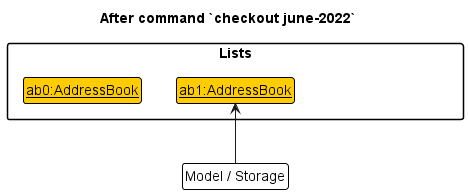
Step 2. The user executes checkout june-2022 command to load the JSON june-2022.json to the storage.
The checkout command calls CheckoutCommandParser#parse(), which checks if the user input is valid, which in turn
calls CheckoutCommand#execute() if it is valid. If the list does not exist in the data folder, the list be created
and populated with sample data. Model and Storage are then loaded with the specified list and the call returns a
CommandResult to Logic.
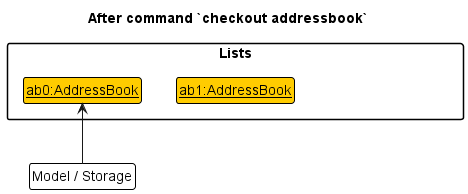
Step 3. The user executes checkout addressbook command to load the default JSON addressbook.json to the storage.
The checkout command calls CheckoutCommandParser#parse(), which checks if the user input is valid, which in turn
calls CheckoutCommand#execute() if it is valid. If the list does not exist in the data folder, the list be created
and populated with sample data. Model and Storage are then loaded with the specified list and the call returns a
CommandResult to Logic.
The following sequence diagram shows how the checkout operation works:
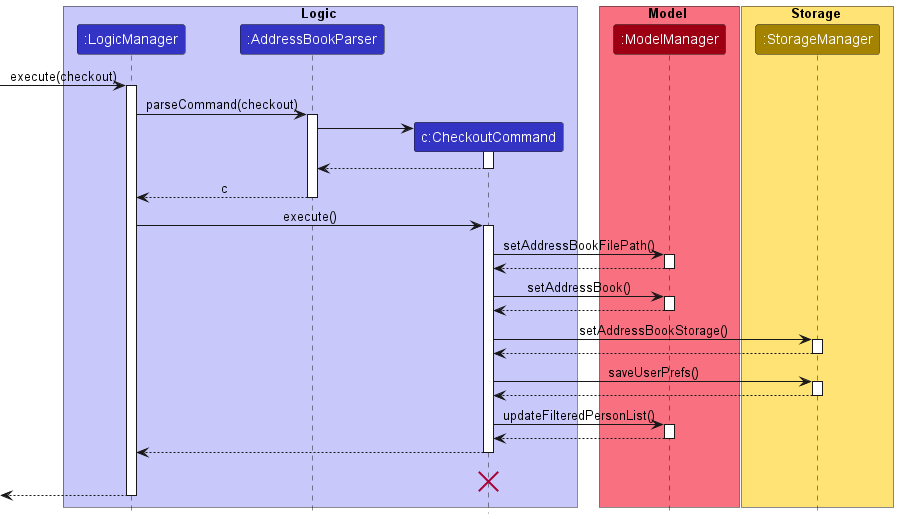
CheckoutCommand
should end at the destroy marker (X) but due to a limitation of PlantUML, the lifeline reaches the end of diagram.
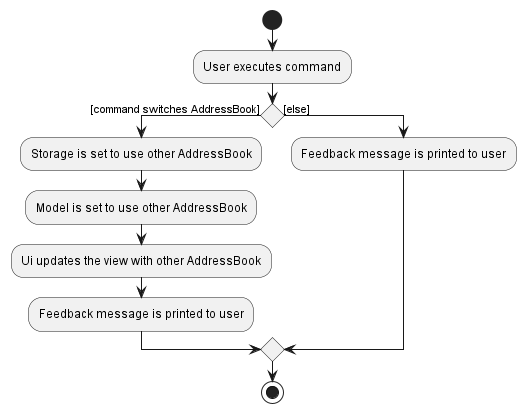
The following activity diagram summarizes what happens when a user executes a checkout command:
Design considerations
Aspect: How checkout executes:
-
Alternative 1 (current choice): Tell the instance of Storage and Model to load the specified AddressBook.
- Pros: Will use less memory (e.g. for each AddressBook, just reuse the current instance of Storage and Model).
- Cons: We must ensure that there are no unintended side effects to the modification of both instances. (e.g. Coupling and Dependencies)
-
Alternative 2 (previous choice): Create a new instance of Storage and Model that loads the specified AddressBook
and set it to be used by the application.
- Pros: Faster to switch between AddressBook since they are already loaded into memory.
- Cons: May have performance issues in terms of memory usage because a new instance is created for every new AddressBook.
4.2 View Feature
Implementation
To allow users to view the details of an applicant, a new class ViewCommand is added that extends Command.
It implements the following operations:
-
ViewCommand#execute()— Executes the command to view a particular applicant in the address book based on theIndexthat was parsed from the user input using theparsemethod ofViewCommandParser. -
ViewCommand#equals()— Checks whether an instance of aViewCommandis equal to another, by checking:- Whether they are the same instance
- Whether the viewed applicant is the same in two different instances
Another FilteredList<Person> is created in ModelManager to facilitate listening of the viewed applicant. Additionally, PersonViewPanel.java, PersonViewCard.java, and their respective .fxml files are also created.
To view the details of an applicant, the user can run the view command from the command box. The input is parsed and handled by the following classes:
-
AddressBookParser, that parses the input and checks whether it contains the wordview, which then proceeds to callViewCommandParser#parse(). -
ViewCommandParser, that parses the input to createIndexof the applicant to be viewed, and returns aViewCommandto be executed by theLogicManager.- If the index provided is invalid (e.g. more than that of the displayed list), it will be handled by
ViewCommandupon execution.
- If the index provided is invalid (e.g. more than that of the displayed list), it will be handled by
Given below is an example success scenario and how the view mechanism behaves at each step.
- The user executes
view INDEX -
LogicManagercallsAddressBookParser#parseCommand(userInput) -
LogicManagercallsViewCommand#execute(model, storage) -
ViewCommandretrieves currently displayed list fromModelby callingModel#getFilteredPersonList() -
ViewCommandcreates a newpersonToViewby retrieving the applicant at the currentIndex -
ViewCommandcreates a newSamePersonPredicateto check if thePersonto be viewed is the same aspersonToView -
ViewCommandupdates theFilteredList<Person>inModelto reflectpersonToViewby evaluating theSamePersonPredicate - A
CommandResultobject indicating that theviewis successful will be created
The following sequence diagram shows how the view command works:
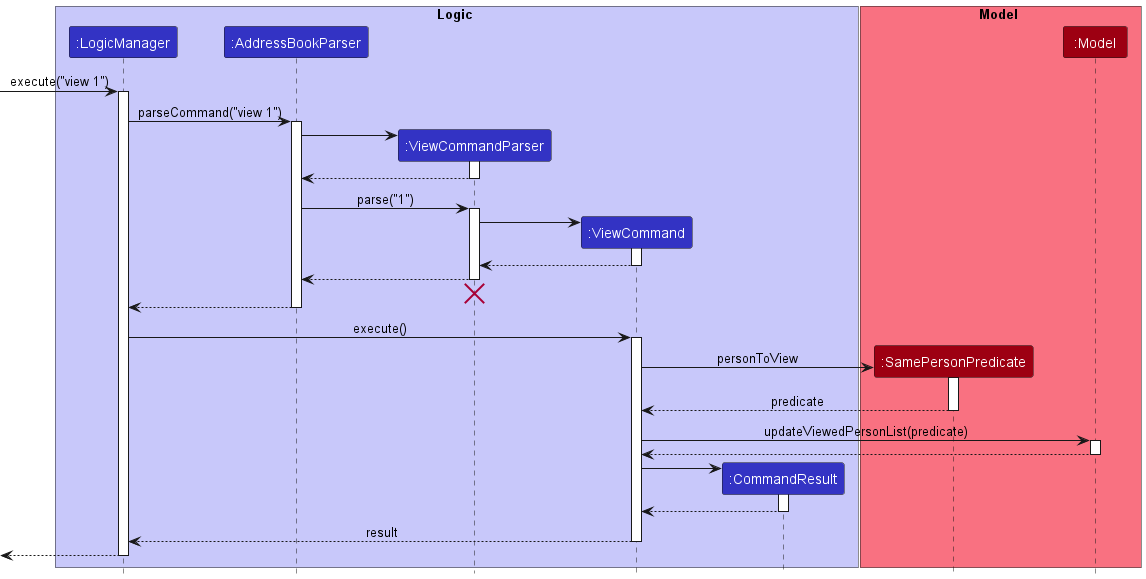
ViewCommandParser
should end at the destroy marker (X) but due to a limitation of PlantUML, the lifeline reaches the end of diagram.
Design considerations
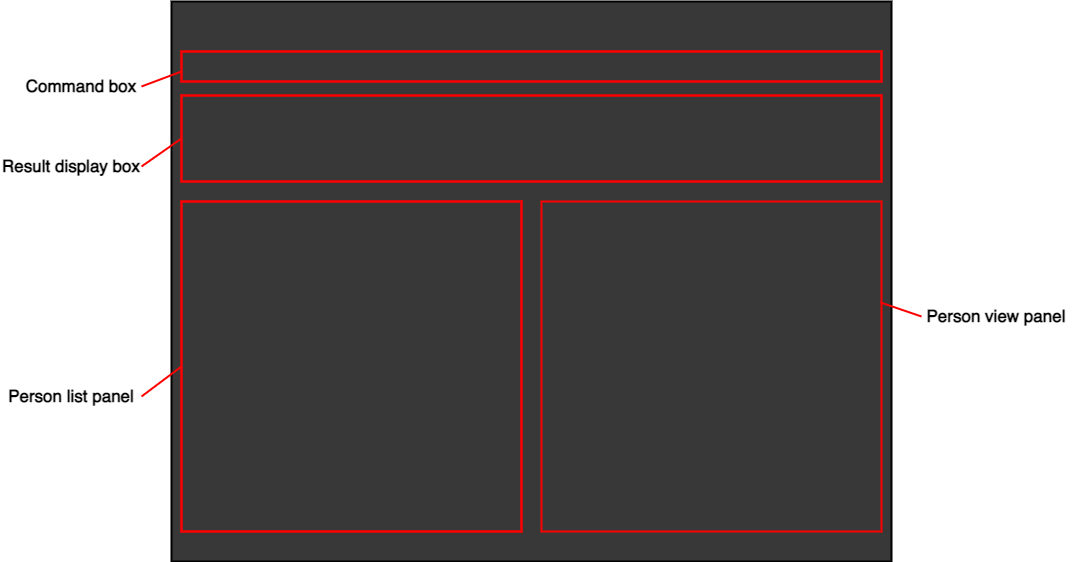
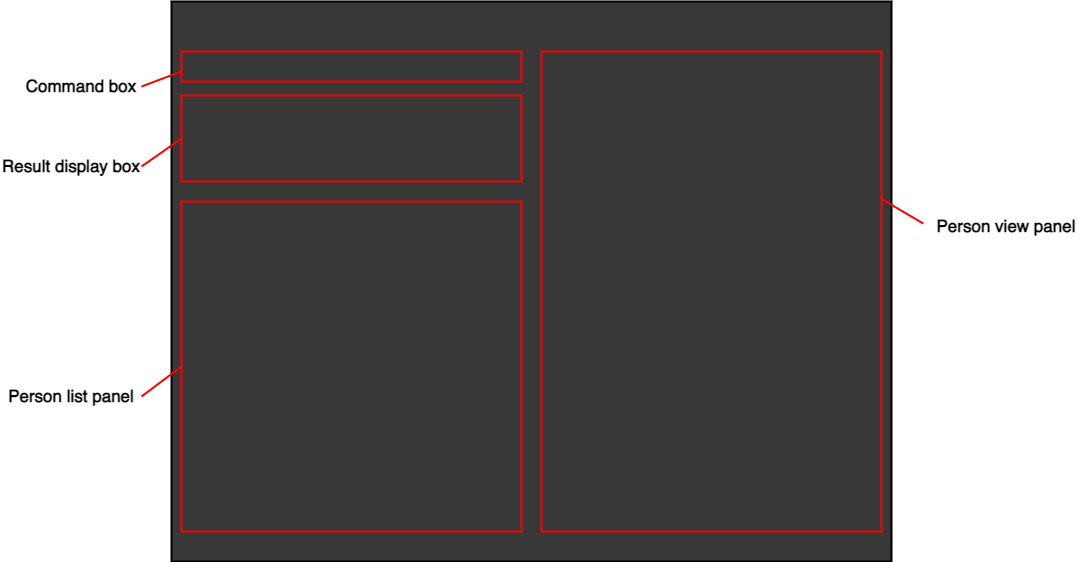
Aspect: How the UI window is split to show a panel of list of all applicants and another panel to view details of an applicant:
-
Alternative 1 (current implementation): Window is split into half below the result display box.
- Pros: Symmetrical and looks more regular.
- Cons: Pane to view details of an applicant is smaller.
-
Alternative 2: Window is split from the top, so both command box and result display box are halved.
- Pros: Can have a larger pane to view details of an applicant.
- Cons: Need to scroll more to see typed command and result displayed.
4.3 Import Feature
The import feature allows the user to append their list with another list imported from an external JSON file, instead of asking them to write the applicants one by one into the command line.
Implementation
The import feature is done through a ImportCommand that extends Command. It is supported by ImportCommandParser
and JsonAddressBookStorage.
Given below is an example success scenario and how the import mechanism behaves at each step.
- The user executes
import fileName.json. -
LogicManagercallsAddressBookParser#parseCommand(userInput). -
LogicManagercallsImportCommand#execute(model, storage). -
ImportCommandcreates aJsonAddressBookStorageobject using the specified file, and callsJsonAddressBookStorage#readAddressBook()to create theAddressBookthat is going to be appended. -
ImportCommandthen callsModel#appendAddressBook(toAppend)to append it to the original list. - A
CommandResultobject indicating that theimportcommand is successful will be created.
The following sequence diagram shows how the import command works:
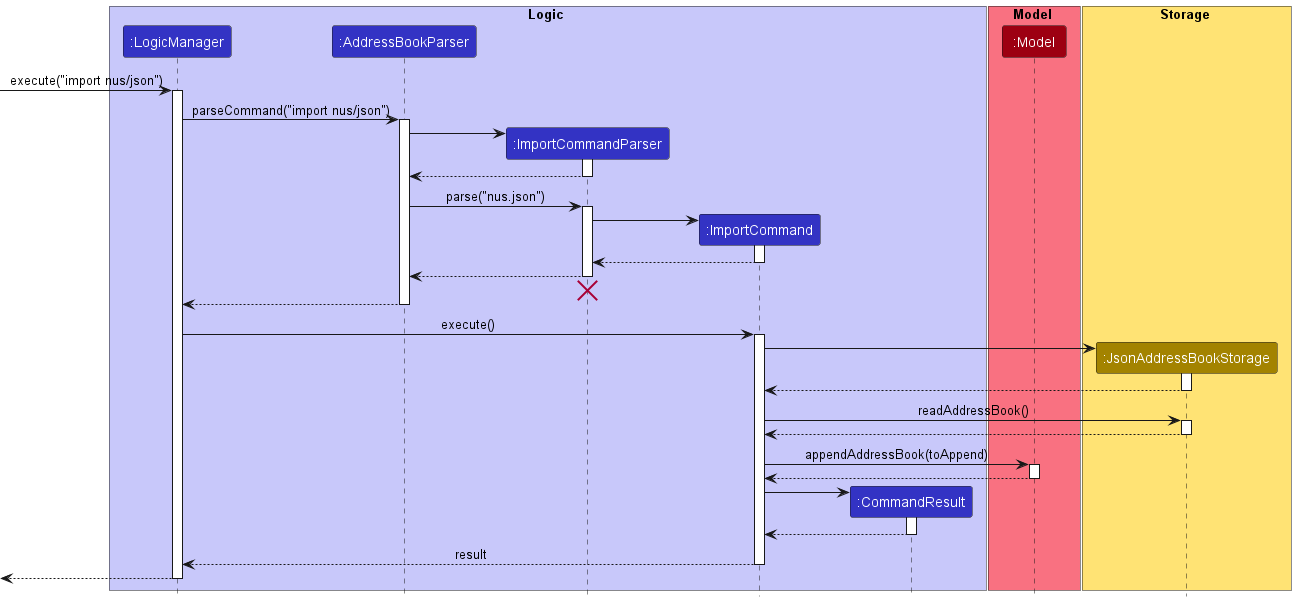
ImportCommandParser
should end at the destroy marker (X) but due to a limitation of PlantUML, the lifeline reaches the end of diagram.
Design Considerations
Aspect: What format should the imported file be
-
Alternative 1 (current implementation): We use the current
addressbook.jsonformat.- Pros:
- Same format as the data file, meaning 1 less format to remember.
- Can be read with current methods.
- Consistent file formatting across the app’s files.
- Cons:
- It may take some time for user to get used to the format.
- Pros:
-
Alternative 2: We use a txt file with a new format
- Pros:
- The format may be easier to remember, as it does not have JSON file restrictions.
- Cons:
- We need to implement new methods to read the txt file.
- The format is not consistent with the rest of the app’s files.
- Pros:
4.4 Export Feature
The export feature allows the user to export the displayed list in InternConnect to a JSON file.
Implementation
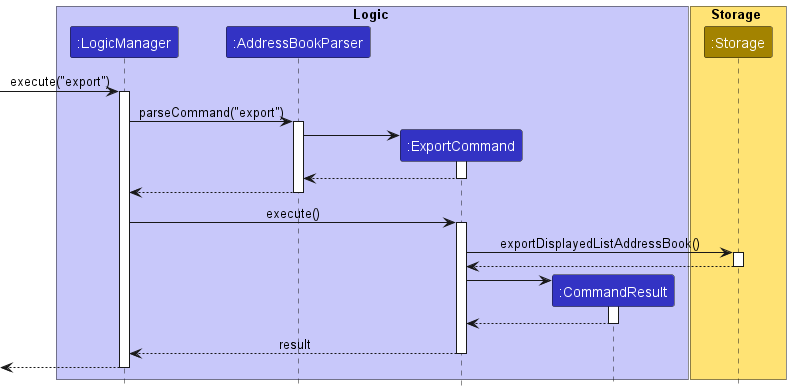
exportCommand class is used in the execution of export command.
Storage#exportDisplayedListAddressBook(displayedListAddressBook, filePath) is called to save the JSON file in data/export/ folder.
Given below is an example success scenario and how the export mechanism behaves at each step.
- The user executes
export -
LogicManagercallsAddressBookParser#parseCommand(userInput) -
LogicManagercallsExportCommand#execute(model, storage) -
ExportCommandgets currentDateTimeand use it for the output JSON file name -
ExportCommandretrieves thedisplayedListfrommodelby callingModel#getFilteredPersonList() -
ExportCommandcallsStorage#exportDisplayedListAddressBook(displayedListAddressBook, filePath) - The displayed list is stored as a JSON file in
data/export/<currentDateTime>.json - A
CommandResultobject indicating that theexportcommand is successful will be created
The following sequence diagram shows how the export command works:
Design Considerations
Aspect: Where to save the exported JSON file
-
Alternative 1 (current implementation): We save the files in the
data/export/folder and use<currentDateTime>.jsonas the file name.- Pros:
- Location for all exported JSON files is in a single folder.
- Naming format for all exported JSON files is fixed.
- Cons:
- Users will not be able to save the files where they like.
- Users will be able to name the JSON file as they wish.
- Pros:
-
Alternative 2: User specifies where to save the JSON file and what to name the file.
- Pros:
- Users will be able to save the JSON file where they like.
- Users will be able to name the JSON file as they wish.
- Cons:
- Harder to implement since there will be a lot of cases to cover, e.g. if the specified path is not in JSON format or not a valid file path or file already exists etc.
- Quite messy since the users can specify a completely different file path/directory everytime they
execute
exportcommand.
- Pros:
-
Alternative 3: We save the files in the
data/export/folder and user specifies only the file name.- Pros:
- Location for all exported JSON files is in a single folder.
- Users will be able to name the JSON file as they wish.
- Cons:
- Harder to implement since there will be a lot of cases to cover, e.g. if the specified file name is not in JSON format or file already exists etc.
- Users will not be able to save the files where they like.
- Pros:
4.5 Find Feature Improvements
The find feature currently allows the user to search by name among all applicants in store by InternConnect. We want to improve onto this feature to allow Users to search by any possible field of choice
Implementation
Currently, the findCommand class is used in the execution of find command. The command is then parsed accordingly, with a NameContainsKeywordsPredicate as an argument to the command. We now want to extend this with 2 changes:
- Add a predicate for each appropriate attribute
- Modify the Parser to appropriately choose the predicates based on a set syntax for its arguments
- Modify the
FindCommandto take in the list of chosen predicates instead of a single predicate - Combine the predicates into a single predicate to filter the displayed list by
Given below is an example success scenario and how the find mechanism behaves at each step.
- The user executes
find. -
LogicManagercallsAddressBookParser#parseCommand(userInput). -
AddressBookParsercallsFindCommandParser#parse(userInput). -
FindCommandParserparses the arguments and creates a find command with its associated list of predicates to search by -
LogicManagercallsFindCommand#execute(model, storage). -
FindCommandcombines the list of predicates into a single predicate, and callsModel#updateFilteredPersonList(predicate). -
FindCommandupdates thedisplayedListfrommodelto display only the Applicants that match the predicate.
The following sequence diagram shows how the find command works:
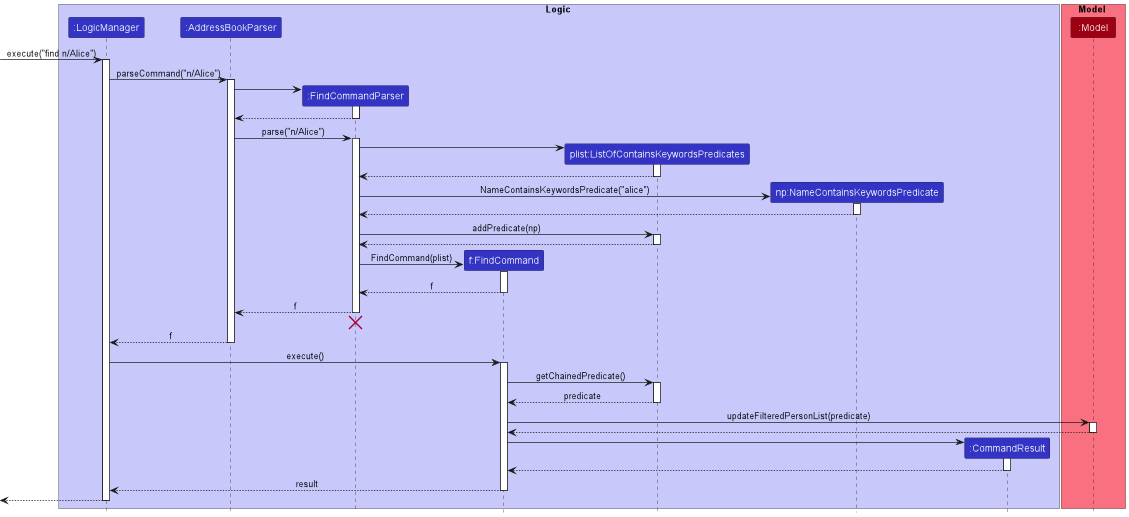
FindCommandParser
should end at the destroy marker (X) but due to a limitation of PlantUML, the lifeline reaches the end of diagram.
Design Considerations
Aspect: Dealing with multiple predicates
-
Alternative 1 (Current Implementation): Combines all the predicates into a single predicate
- Pros:
- Consistent with the current implementation of
find, which uses a single predicate - Creation of specific predicate for each field type, allows for customization of each field’s search implementation
- Can combine the predicates by OR or AND search as the developer intends for
- Modular design reduces coupling, and allows for easy extension and testing of the
findcommand
- Consistent with the current implementation of
- Cons:
- Requires creation of predicate for each field type, can be tedious to implement and test
- Requires the developer to decide how to combine the predicates and to decide the search type for each field, which reduces customizability of the search query for the user.
- Pros:
-
Alternative 2: Empower user to create predicates themselves, and how they want to combine and search the list with their created predicates
- Pros:
- Allows for greater customizability of the search query for the user
- Allows for greater flexibility of the search query for the user
- Cons:
- Unintuitive for a first time user to use. Requires the user to know the syntax creating a predicate, and requires the user to know how to combine predicates as they intend for which can be tedious to learn
- Security of program will go down, as we allow user to input functions that will be evaluated by the program. Malicious input may be able to compromise the program.
- Pros:
Aspect: Different search types
-
Alternative 1: we create a new command for each type of search
- Pros:
- All commands current follow this design, allows for consistency in code structure, and follows current OOP design conventions.
- Naming format for all commands are fixed.
- Cons:
- Users will expect the
findcommand to be under the same category/usage scenario as afindAllcommand and afindSubstringcommand
- Users will expect the
- Pros:
-
Alternative 2: flag is used within the find command to allow usage to select the type of search they want to perform
- Pros:
- Users who are already familiar with the
findcommand can extend further its power and functionality with flags without “relearning” a new syntax for a different command. - Users will find it intuitive that a
findcommand is the main overlying command, and within its syntax they can change the way its used, similar to how current CLI commands are implemented - Future commands which want to use flags can build onto the newly restructured code
- Users who are already familiar with the
- Cons:
- Harder to implement since a flag is a brand-new functionality which other commands do not have. Coupled classes have to be modified accordingly, such as the relevant parser classes and argumentTokenizer/Multimap
- Flags introduce the possibility for more input types to consider, and these affects the inputs that users can use in all commands
- Requires restructuring old code, which will increase testing time and possibility of introducing bugs into existing code
- Pros:
-
Alternative 3 (current implementation): Choose a search type for each field type
- Pros:
- Allow for multiple field searches where the search within each field is curated to best search the available field values
- Intuitive and easy for Users to use
- Less syntax and user input required in comparison to alternative 2
- Cons:
- Limits User’s freedom in how they want to search
- Search type for the field may not be how the User wants to search
- Pros:
5. Documentation, logging, testing, configuration, dev-ops
6. Appendix A: Requirements
6.1 Product scope
Target user profile:
- is an internship campus recruiter
- has a need to manage a significant number of applicants
- prefer desktop apps over other types
- can type fast
- prefers typing to mouse interactions
- is reasonably comfortable using CLI apps
Value proposition: a one-stop, convenient, and efficient platform to manage and empower how internship campus recruiters work with their applicants’ data. Say goodbye to opening multiple windows to retrieve the information you need and focus on what matters more: matching the right people for the right job.
6.2 User stories
Priorities: High (must have) - * * *, Medium (nice to have) - * *, Low (unlikely to have) - *
| Priority | As a … | I want to … | So that I can … |
|---|---|---|---|
* * * |
new user | ask for instructions on how to use the app by inputting a command to the query | learn how to use the app fully |
* * * |
new user | start the list with a sample data | play around and see how the app works |
* * * |
user | add new applicants | |
* * * |
user | edit an applicant | keep my list updated |
* * * |
user | view the details of the applicant I am interested in | |
* * * |
user | list all my current applicants | |
* * * |
user | delete an applicant | remove entries that I no longer need |
* * * |
experienced user | edit the data file manually | efficiently edit numerous data at once |
* * |
user ready to start using the app | clear all current data | get rid of sample/experimental data I used for exploring the app or quickly erase all of my applicant’s data |
* * |
user | search for applicants by fields | quickly find the applicants that I need without having to go through the entire list |
* * |
user | import applicants’ data from a human editable file | mass-add my data quickly and conveniently without hassle |
* * |
user | export the current list of applicants that I have | share my data with others |
* * |
user | have multiple lists of applicant and checkout between them | work with different sets of data |
* |
user | give customised tag to applicants | label them accordingly |
* |
user | close the app |
6.3 Use cases
(For all use cases below, the System is the InternConnect and the Actor is the user, unless specified otherwise)
Use case: UC01 - List all applicants
MSS
- User requests to list all applicants
-
InternConnect shows all applicants
Use case ends.
Use case: UC02 - Add an applicant
MSS
- User requests to add an applicant with its parameters
- InternConnect adds the applicant
-
InternConnect shows newly added applicant, as well as the updated list of applicants
Use case ends.
Extensions
-
1a. The given format is invalid.
-
1a1. InternConnect shows an error message.
Use case ends.
-
-
1b. The specified applicant is a duplicate to another applicant in the list.
-
1b1. InternConnect shows an error message.
Use case ends.
-
-
1c. The specified applicant has an invalid data value.
-
1c1. InternConnect shows an error message.
Use case ends.
-
Use case: UC03 - Edit an applicant
MSS
- User requests to list all applicants (UC01)
- User requests to modify an applicant at a certain index with its parameters
- InternConnect modifies the applicant
-
InternConnect shows the updated applicant
Use case ends.
Extensions
-
1a. The list is empty.
Use case ends.
-
2a. The given format is invalid.
-
2a1. InternConnect shows an error message.
Use case ends.
-
-
2b. The given index is not a positive integer or is out of bounds.
-
2b1. InternConnect shows an error message.
Use case ends.
-
-
2c. The specified applicant is a duplicate to another applicant in the list.
-
2c1. InternConnect shows an error message.
Use case ends.
-
-
2d. The specified applicant has an invalid data value.
-
2d1. InternConnect shows an error message.
Use case ends.
-
-
2e. No valid parameters were given.
-
2e1. InternConnect shows an error message.
Use case ends.
-
Use case: UC04 - Delete an applicant
MSS
- User requests to list all applicants (UC01)
- User requests to delete an applicant at a certain index in the list
- InternConnect deletes the applicant
-
InternConnect shows the updated list of applicants
Use case ends.
Extensions
-
1a. The list is empty.
Use case ends.
-
2a. The given format is invalid.
-
2a1. InternConnect shows an error message.
Use case ends.
-
-
2b. The given index is not a positive integer or is out of bounds.
-
2b1. InternConnect shows an error message.
Use case ends.
-
Use case: UC05 - View an applicant
MSS
- User requests to list all applicants (UC01)
- User requests to view an applicant at a certain index in the list
-
InternConnect shows the detailed data of the applicant
Use case ends.
Extensions
-
1a. The list is empty.
Use case ends.
-
2a. The given format is invalid.
-
2a1. InternConnect shows an error message.
Use case ends.
-
-
2b. The given index is not a positive integer or is out of bounds.
-
2b1. InternConnect shows an error message.
Use case ends.
-
Use case: UC06 - Find applicants by field
MSS
- User requests to list all applicants (UC01)
- User requests to find all applicants with matching keywords in its specified fields
- InternConnect lists all applicants who match the request
Use case ends.
Extensions
-
1a. The list is empty.
Use case ends.
-
2a. The given format is invalid.
-
2a1. InternConnect shows an error message.
Use case ends.
-
-
2b. No valid parameters were given.
-
2b1. InternConnect shows an error message.
Use case ends.
-
Use case: UC07 - Import applicants from an external JSON file
MSS
- User requests to import applicants from a JSON file
- InternConnect adds all applicants
-
InternConnect shows the updated list of applicants
Use case ends.
Extensions
-
1a. The given format is invalid.
-
1a1. InternConnect shows an error message.
Use case ends.
-
-
1b. The given file name does not exist, is invalid or is not a file in JSON format.
-
1b1. InternConnect shows an error message.
Use case ends.
-
-
1c. The given file has invalid value, incorrect format, and/or duplicate applicants.
-
1c1. InternConnect shows an error message and creates a template file.
Use case ends.
-
Use case: UC08 - Export displayed list to a JSON file
MSS
- User requests to list all applicants (UC01) or find applicants by field (UC06)
- User requests to export displayed list to a JSON file
-
InternConnect exports displayed list to a JSON file
Use case ends.
Use case: UC09 - Checkout a JSON file
MSS
- User requests to checkout a JSON file
- InternConnect loads all applicants from the file.
-
InternConnect displays the loaded applicants.
Use case ends.
Extensions
-
1a. The given format is invalid.
-
1a1. InternConnect shows an error message.
Use case ends.
-
-
1b. The given file name does not exist, is invalid or is not a file in JSON format..
- 1b1. InternConnect creates a new JSON file with the given file name.
-
1b2. InternConnect fills the data with sample data.
Use case resumes from step 2.
-
1c. The given file has invalid value, incorrect format, and/or duplicate applicants.
- 1c1. InternConnect wipes all data from the file.
-
1c2. InternConnect fills the data with an empty data.
Use case resumes from step 2.
Use case: UC10 - Exit
MSS
- User requests to exit from InternConnect
-
InternConnect is closed
Use case ends.
Use case: UC11 - Help
MSS
- User requests for help
-
InternConnect shows a pop-up window with the link to the User Guide
Use case ends.
6.4 Non-Functional Requirements
- Should work on any mainstream OS as long as it has Java
11or above installed. - Should be able to hold up to 1000 applicants without a noticeable sluggishness in performance for typical usage.
- A user with above average typing speed for regular English text (i.e. not code, not system admin commands) should be able to accomplish most of the tasks faster using commands than using the mouse.
- GUI should be color-blind friendly
- Data should be stored locally and not use any database management system.
- The application should work with a single JAR file, and should work without requiring an installer.
- The application size should not exceed 100MB.
- Application should not use more than 4GB of RAM.
- The product should be for a single user i.e. (not a multi-user product).
- The data should be stored locally and should be in a human editable text file.
- The GUI should work well (i.e., should not cause any resolution-related inconveniences to the user) for standard screen resolutions 1920x1080 and higher, and for screen scales 100% and 125%.
- In addition, the GUI should be usable (i.e., all functions can be used even if the user experience is not optimal) for resolutions 1280x720 and higher, and for screen scales 150%.
6.5 Glossary
- Applicant: An applicant refers to a person who has applied for a job.
- Job: A job opening the applicant applied for
- Command Line Interface (CLI): Text-based user interface
- Graphical User Interface (GUI): Graphic-based user interface
- Mainstream OS: Windows, Linux, Unix, OS-X
- Main Success Scenario (MSS): Describes the most straightforward interaction for a given use case, which assumes that nothing goes wrong
7. Appendix B: Instructions for manual testing
Given below are instructions to test the app manually.
7.1 Launch and shutdown
-
Initial launch
-
Download the jar file and copy into an empty folder
-
Double-click the jar file expected: Shows the GUI with a set of sample applicants.
-
-
Saving window preferences
-
Resize the window to an optimum size. Move the window to a different location. Close the window.
-
Re-launch the app by double-clicking the jar file.
Expected: The most recent window size and location is retained.
-
7.2 Adding an applicant
-
Adding an applicant to InternConnect
-
Prerequisites: No applicant with the email
johnd@example.com -
Test case:
add add n/John Doe p/98765432 e/johnd@example.com a/311, Clementi Ave 2, #02-25 c/3.50/4.00 g/male
u/Nanyang Polytechnic gd/05-2024 m/Computer Science ji/J12300 jt/Software Engineer Intern t/rejected t/KIV
Expected: An applicant named John Doe is added. Details of the added applicant shown in the view panel. Success message shown in the status message.
-
-
Adding a duplicate applicant to InternConnect
-
Prerequisites: There exists an applicant with email
johndoe@example.comand jobIDJ12300 -
Test case:
add add n/John Doe p/98765432 e/johndoe@example.com a/311, Clementi Ave 2, #02-25 c/3.50/4.00 g/male
u/Nanyang Polytechnic gd/05-2024 m/Computer Science ji/J12300 jt/Software Engineer Intern t/rejected t/KIV
Expected: No applicant is added. Error details shown in the status message.
-
-
Adding an applicant with not all parameter specified
-
Prerequisites: None
-
Test case:
add add n/John Doe
Expected: No applicant is added. Error details shown in the status message.
-
-
Other incorrect
addcommands to try:add,add 1
Expected: No applicant is added. Error details shown in the status message.
7.3 Viewing the detail of an applicant
-
Viewing an existing applicant in the currently displayed list
-
Prerequisites: The displayed list contains at least one applicant
-
Test case:
view 1Expected: Details of the first applicant in the list shown in the view panel. Success message shown in the status message.
-
-
Viewing an empty displayed list
-
Prerequisites: The displayed list is empty
-
Test case:
view 1Expected: No applicant is viewed. Error details shown in the status message.
-
-
Viewing a non-positive index
-
Prerequisites: List all applicants using the list command. Multiple applicants in the list.
-
Test case:
view 0Expected: No applicant is viewed. Error details shown in the status message.
-
-
Other incorrect
viewcommands to try:view,view john,view x(wherexis larger than the list size)
Expected: No applicant is viewed. Error details shown in the status message.
7.4 Editing an applicant
-
Editing at least one parameter of an applicant on InternConnect
-
Prerequisites: One applicant in the application.
-
Test case:
edit 1 u/NUS
Expected: The university of the applicant in the first index is changed toNUS. Details of the first applicant in the list shown in the view panel. Success message shown in the status message. -
Test case:
edit 1 u/NUS p/12345678 g/male
Expected: The university, phone number, and gender of the applicant in the first index is changed toNUS,12345678, andmalerespectively. Details of the first applicant in the list shown in the view panel. Success message shown in the status message.
-
7.5 Deleting an applicant
-
Deleting an applicant while all applicants are being shown
-
Prerequisites: List all applicants using the
listcommand. Multiple applicants in the list. -
Test case:
delete 1
Expected: First applicant is deleted from the list. Details of the deleted applicant shown in the status message. Success message shown in the status message.
-
-
Deleting a non-positive index
-
Prerequisites: List all applicants using the
listcommand. Multiple applicants in the list. -
Test case:
delete 0
Expected: No applicant is deleted. Error details shown in the status message.
-
-
Other incorrect
deletecommands to try:delete,delete john,delete x(wherexis larger than the list size)
Expected: No applicant is deleted. Error details shown in the status message.
7.6 Locating applicants by field
-
Finding all applicants with specified fields
-
Prerequisites: There exists a valid list of applicants in InternConnect that is not empty
-
Test case:
find n/Alex
Expected: All applicants with the nameAlexare listed in the left panel. Number of applicants found shown in the status message. -
Test case:
find g/Male m/Computer Science
Expected: All male applicants who have majors with eitherComputerorSciencein their major are listed in the left panel. Number of applicants found shown in the status message.
-
-
No applicants to search for
-
Prerequisites: There is an empty list of applicants in InternConnect
-
Test case:
find specifer/SPECIFER_KEYWORD
Expected: No applicants will be listed in the left display panel.0 persons listed!shown in the status message.
-
7.7 Importing applicants from an external JSON file
-
Importing several applicants from an external JSON file
-
Prerequisites: There exists a valid file named
test.jsonwith the correct formatting, no duplicate applicants, and valid data values. -
Test case:
import test.json
Expected: All applicants insidetest.jsonwill be appended to the list. Success message shown in the status message.
-
-
Importing an external JSON file with invalid format, duplicate applicant, or invalid data values
-
Prerequisites: There exists a file named
format.jsonwith incorrect formatting,duplicate.jsonwith duplicate applicants, andinvalid.jsonwith invalid data values. -
Test case:
import format.json
Expected: No applicant is added. Template file created indata/template/template.json. Error details shown in the status message. -
Test case:
import duplicate.json
Expected: No applicant is added. Template file created indata/template/template.json. Error details shown in the status message. -
Test case:
import invalid.json
Expected: No applicant is added. Template file created indata/template/template.json. Error details shown in the status message.
-
-
Other incorrect import commands to try:
import,import folderName(wherefolderNameis a folder)
Expected: No applicant is added. Error details shown in the status message.
7.8 Exporting displayed list to a JSON file
-
Exporting empty displayed list
-
Test case:
find g/nonbinaryfollowed byexportExpected: JSON file created indata/export/folder with a key-value pair where the key is “persons” and value is an empty array. Success message shown in the status message. -
Test case:
find g/nonbinaryfollowed byexport 1Expected: JSON file created indata/export/folder with a key-value pair where the key is “persons” and value is an empty array. Success message shown in the status message.
-
-
Exporting non-empty displayed list
-
Prerequisite: currently displayed list is not empty
-
Test case:
exportExpected: JSON file created indata/export/folder with a key-value pair where the key is “persons” and value is a non-empty array. Success message shown in the status message. -
Test case:
export aExpected: JSON file created indata/export/folder with a key-value pair where the key is “persons” and value is a non-empty array. Success message shown in the status message.
-
7.9 Checkout a new or existing list
-
Checkout to an existing file with valid data and valid format.
-
Prerequisites: One JSON file with valid data and valid format in
data/folder. -
Test case:
checkout FILE_NAMEExpected: The data in the fileFILE_NAME.jsonlocated atdata/folder is loaded into the application. Success message shown in the status message.
-
-
Checkout to a non-existent file.
-
Prerequisites: No file with the name
FILE_NAMEindata/folder. -
Test case:
checkout FILE_NAMEExpected: The fileFILE_NAME.jsonis created atdata/folder and its sample data is loaded into the application. Success message shown in the status message.
-
-
Checkout to an existing file with invalid data or invalid format.
-
Prerequisites: One JSON file with invalid data or invalid format in
data/folder. -
Test case:
checkout FILE_NAMEExpected: The data in the fileFILE_NAME.jsonlocated atdata/folder is wiped. The application will not contain any applicants. Success message shown in the status message.
-